loadbalancing containers with docker-compose
docker-compose
I’m late, I know, very very late.
I just didn’t find the time to look at docker-compose for real. I really was busy.
docker-compose is the replacement for the old project fig, which is now deprecated.
Kinda liked the name fig. But that’s perhaps because I love to eat some dried figs, especially before a run.

docker-compose helps you orchestrate your containers. Which means you can define your application environment with one simple YAML file.
Afterwards you are able to start up all necessary containers of the environment, i.e web containers, loadbalancer, proxies and database with one shell command:
~$ docker-compose upYou can find a lot of beginner tutorials on how to use docker-compose. This is why I wanted to try out a bit more than just starting an app and database container and linking them together.
example environment with loadbalancer
My idea was to startup this environment with docker-compose
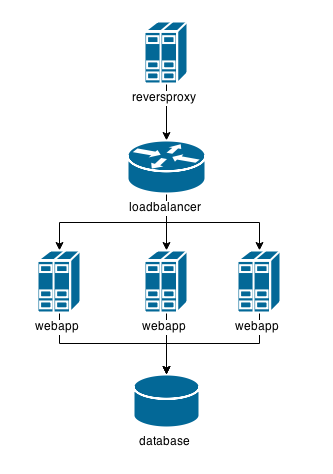
We are going to use the tutum/haproxy image for the loadbalancer and the redis image for the database.
For the other components, I’m gonna create a nginx proxy and a flask web app.
installation of docker-compose
Docker-compose isn’t part of the docker package. So you will need to install it separately.
There are many ways to install it, including a curl-way. But I prefer
~$ sudo pip install docker-composeFor further information visit the docker docs.
LET’S-AH-GO

First we will need to create a project directory. Let’s just call it example
~$ mkdir example
~$ cd example
In this directory we will create a directory for each of our custom containers we are going to build, which are the nginx and flask. To simplify things, I’ll call the flask web app directory just app.
~/example$ mkdir nginx appnginx container
We will use j2cli to create a nginx configuration from a template.
The syntax is jinja2. This will make it very easy to dynamically set the loadbalancer address and port as a proxy.
Our container can get this information from the environment variables which are set upon linking it to the haproxy.
Don’t bother mentioning that I defined localhost as servername. It’s obvious that you have to set it to your prefered one.
~/example$ cd nginx
~/example/nginx$ vim nginx.tmpl
user nginx;
daemon off;
worker_processes 1;
error_log /proc/self/fd/2 warn;
pid /var/run/nginx.pid;
events {
worker_connections 1024;
}
http {
resolver 8.8.8.8;
include /etc/nginx/mime.types;
default_type application/octet-stream;
log_format main '$remote_addr - $remote_user [$time_local] "$request" '
'$status $body_bytes_sent "$http_referer" '
'"$http_user_agent" "$http_x_forwarded_for"';
access_log /var/log/nginx/access.log main;
sendfile on;
keepalive_timeout 65;
server {
listen 80;
server_name localhost;
access_log /proc/self/fd/1;
error_log /proc/self/fd/2;
location / {
proxy_intercept_errors on;
proxy_pass http://{{ HAPROXY_PORT_80_TCP_ADDR }}:{{ HAPROXY_PORT_80_TCP_PORT }}$request_uri?;
proxy_set_header Host $server_name;
}
}
}Why redirect the logs to /proc/self/fd/{1,2} you ask? Thanks to this we can see our logs with docker logs.
Now we create our Dockerfile and start script.
~/example/nginx$ cat > Dockerfile <<EOF
FROM nginx:latest
RUN apt-get update -y
RUN apt-get install -y python-pip
RUN pip install j2cli
COPY start /start
RUN chmod +x /start
COPY nginx.tmpl /nginx.tmpl
CMD /start
EXPOSE 80
EOF
~/example/nginx$ cat > start <<EOF
#!/bin/bash
j2 /nginx.tmpl > /etc/nginx/nginx.conf
nginx
EOF
We could now build the docker image, but we will leave that to docker-compose.
flask app container
Let’s concentrate on our flask web app now.
~/example/nginx$ cd ../appThe objective is to have a simple index page showing data from the database, i.e a visit counter. To test our loadbalancer I want to return the hostname too.
Here is the code I’m using. I saved it under ~/example/app/app.py.
#!/usr/bin/env python

from flask import Flask
import socket,redis,os

r=redis.Redis(host=os.getenv("REDIS_PORT_6379_TCP_ADDR"),port=os.getenv("REDIS_PORT_6379_TCP_PORT"))
r.set("count",0)

app = Flask(__name__)

@app.route("/")
def index():
    r.incr("count")
    return "Visit number %d\nHostname: %s\n" % (int(r.get("count")),socket.gethostname())

if __name__ == "__main__" :
    app.run(host="0.0.0.0")
I’m using the environment variables REDIS_PORT_6379_TCP_ADDR and REDIS_PORT_6379_TCP_PORT to connect to the redis database.
This environment variables will be available thanks to linking the container to the redis database.
Now let’s create a Dockerfile for our web app too.
~/example/app$ cat > Dockerfile << EOF
FROM python
RUN pip install flask redis
WORKDIR /
COPY app.py /
EXPOSE 5000
CMD python app.py
EOF
docker-compose.yml
We are nearly there. We just need to create our pretty YAML file as a definition for our “container orchestra”.
~/example/app$ cd ..
~/example$ vim docker-compose.yml
app:
build: app
links:
- redis
haproxy:
image: tutum/haproxy
links:
- app
environment:
- BACKEND_PORT=5000
redis:
image: redis
nginx:
build: nginx
ports:
- "80:80"
links:
- haproxyWe are defining the components in a really simple way. The build options tells docker-compose in which directory it can switch to build the container image.
image is used to take an already existing image.
links is one of the most exciting options. Not only it tells our containers with which other components it is linked to, it also creates a dependency-relationship between them. It makes sure your containers will start in the right order.
Our app is listening to port 5000, that’s why I’m passing BACKEND_PORT as environment variable to the haproxy. It will now forward requests to the right port.
Finally, I want to test the app over our nginx. That’s why I’m mapping 80:80 with the help of ports
docker-compose up?
No, not yet. There is something else we have to do.
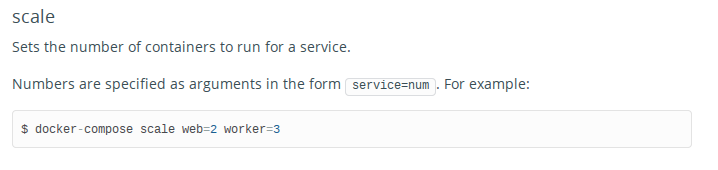
With this configuration docker-compose would only start one single web app container. But we want to start three. This is where docker-compose scale comes in handy.
Taken from the command line reference:

~$ export MIND=BLOWNWhy not try it out?
~/example$ docker-compose scale app=3
Creating example_app_1...
Building app...
Step 0 : FROM python
---> a49c4488c5c5
Step 1 : RUN pip install flask redis
---> Running in 12f63d3c626c
You are using pip version 6.0.8, however version 6.1.1 is available.
You should consider upgrading via the 'pip install --upgrade pip' command.
Collecting flask
Downloading Flask-0.10.1.tar.gz (544kB)
Collecting redis
Downloading redis-2.10.3.tar.gz (86kB)
Collecting Werkzeug>=0.7 (from flask)
Downloading Werkzeug-0.10.4-py2.py3-none-any.whl (293kB)
Collecting Jinja2>=2.4 (from flask)
Downloading Jinja2-2.7.3.tar.gz (378kB)
Collecting itsdangerous>=0.21 (from flask)
Downloading itsdangerous-0.24.tar.gz (46kB)
Collecting markupsafe (from Jinja2>=2.4->flask)
Downloading MarkupSafe-0.23.tar.gz
Installing collected packages: markupsafe, itsdangerous, Jinja2, Werkzeug, redis, flask
Running setup.py install for markupsafe
building 'markupsafe._speedups' extension
gcc -pthread -Wno-unused-result -DNDEBUG -g -fwrapv -O3 -Wall -Wstrict-prototypes -fPIC -I/usr/local/include/python3.4m -c markupsafe/_speedups.c -o build/temp.linux-x86_64-3.4/markupsafe/_speedups.o
gcc -pthread -shared build/temp.linux-x86_64-3.4/markupsafe/_speedups.o -L/usr/local/lib -lpython3.4m -o build/lib.linux-x86_64-3.4/markupsafe/_speedups.cpython-34m.so
Running setup.py install for itsdangerous
Running setup.py install for Jinja2

Running setup.py install for redis
Running setup.py install for flask
Successfully installed Jinja2-2.7.3 Werkzeug-0.10.4 flask-0.10.1 itsdangerous-0.24 markupsafe-0.23 redis-2.10.3
---> b70e0febf667
Removing intermediate container 12f63d3c626c
Step 2 : WORKDIR /
---> Running in 72e0eea4efb4
---> f0b3bc060fed
Removing intermediate container 72e0eea4efb4
Step 3 : COPY app.py /
---> 3f52670905e2
Removing intermediate container 8dbddf8c7ee0
Step 4 : EXPOSE 5000
---> Running in 4c2253b73418
---> 33db3a5e32f2
Removing intermediate container 4c2253b73418
Step 5 : CMD python app.py
---> Running in b00e327eaf06
---> b0c249155d23
Removing intermediate container b00e327eaf06
Successfully built b0c249155d23
Creating example_app_2...
Creating example_app_3...
Starting example_app_1...
Starting example_app_2...
Starting example_app_3...Aha.
It builds the container image and creates 3 containers. But is it starting them up already?
We can look that up with docker. The answer is yes, but no. It simply stopped them afterwards.
~/example$ docker images
REPOSITORY                            TAG                 IMAGE ID            CREATED             VIRTUAL SIZE
example_app                           latest              b0c249155d23        2 minutes ago       765.4 MB
~/exmample$ docker ps -a
CONTAINER ID        IMAGE                COMMAND                CREATED             STATUS                     PORTS               NAMES
fb01b5e2ce46        example_app:latest   "/bin/sh -c 'python    2 minutes ago       Exited (1) 2 minutes ago                       example_app_3
675b86849f4b        example_app:latest   "/bin/sh -c 'python    2 minutes ago       Exited (1) 2 minutes ago                       example_app_2
2926a6feed1e        example_app:latest   "/bin/sh -c 'python    2 minutes ago       Exited (1) 2 minutes ago                       example_app_1
what about docker-compose up now?
Yes. Now is the time to finally bring the environment up.
~/example$ docker-compose up
Creating example_redis_1...
Recreating example_app_3...
Recreating example_app_2...
Recreating example_app_1...
Creating example_haproxy_1...
Creating example_nginx_1...
Building nginx...
Step 0 : FROM nginx:latest
---> e46b3488b010
Step 1 : RUN apt-get update -y
---> Using cache
---> a0d74bba86e7
Step 2 : RUN apt-get install -y python-pip
---> Using cache
---> 6d6b94b87f7f
Step 3 : RUN pip install j2cli
---> Using cache
---> e7178f495e1e
Step 4 : COPY start /start
---> bfd0762c54f6
Removing intermediate container 42917750d52a
Step 5 : RUN chmod +x /start
---> Running in 4ddbd2f2d45a
---> 23f3f06f9e1a
Removing intermediate container 4ddbd2f2d45a
Step 6 : COPY nginx.tmpl /nginx.tmpl
---> f96bb181cf40
Removing intermediate container 3c86e129fb2e
Step 7 : CMD /start
---> Running in 75bccb43fb36
---> b1083e3519cd
Removing intermediate container 75bccb43fb36
Step 8 : EXPOSE 80
---> Running in 5824ef94f5b1
---> 4e8b8e12d8ce
Removing intermediate container 5824ef94f5b1
Successfully built 4e8b8e12d8ce
Attaching to example_redis_1, example_app_5, example_app_4, example_app_3, example_haproxy_1, example_nginx_1
redis_1   | 1:C 18 Apr 07:31:35.056 # Warning: no config file specified, using the default config. In order to specify a config file use redis-server /path/to/redis.conf
redis_1   |                 _._
redis_1   |            _.-``__ ''-._
redis_1   |       _.-``    `.  `_.  ''-._           Redis 3.0.0 (00000000/0) 64 bit
redis_1   |   .-`` .-```.  ```\/    _.,_ ''-._
redis_1   |  (    '      ,       .-`  | `,    )     Running in standalone mode
redis_1   |  |`-._`-...-` __...-.``-._|'` _.-'|     Port: 6379
redis_1   |  |    `-._   `._    /     _.-'    |     PID: 1
redis_1   |   `-._    `-._  `-./  _.-'    _.-'
redis_1   |  |`-._`-._    `-.__.-'    _.-'_.-'|
redis_1   |  |    `-._`-._        _.-'_.-'    |           http://redis.io
redis_1   |   `-._    `-._`-.__.-'_.-'    _.-'
redis_1   |  |`-._`-._    `-.__.-'    _.-'_.-'|
redis_1   |  |    `-._`-._        _.-'_.-'    |
redis_1   |   `-._    `-._`-.__.-'_.-'    _.-'
redis_1   |       `-._    `-.__.-'    _.-'
redis_1   |           `-._        _.-'
redis_1   |               `-.__.-'
redis_1   |
redis_1   | 1:M 18 Apr 07:31:35.061 # Server started, Redis version 3.0.0
redis_1   | 1:M 18 Apr 07:31:35.061 # WARNING overcommit_memory is set to 0! Background save may fail under low memory condition. To fix this issue add 'vm.overcommit_memory = 1' to /etc/sysctl.conf and then reboot or run the command 'sysctl vm.overcommit_memory=1' for this to take effect.
redis_1   | 1:M 18 Apr 07:31:35.062 # WARNING: The TCP backlog setting of 511 cannot be enforced because /proc/sys/net/core/somaxconn is set to the lower value of 128.
redis_1   | 1:M 18 Apr 07:31:35.062 * The server is now ready to accept connections on port 6379
app_4     |  * Running on http://0.0.0.0:5000/ (Press CTRL+C to quit)
app_3     |  * Running on http://0.0.0.0:5000/ (Press CTRL+C to quit)
haproxy_1 | No SSL certificate provided
haproxy_1 | INFO:__main__:HAproxy is not running in Tutum
haproxy_1 | INFO:__main__:HAProxy configuration has been changed:
haproxy_1 | global
haproxy_1 |   log 127.0.0.1 local0
haproxy_1 |   log 127.0.0.1 local1 notice
haproxy_1 |   maxconn 4096
haproxy_1 |   tune.ssl.default-dh-param 2048
haproxy_1 |   pidfile /var/run/haproxy.pid
haproxy_1 |   user haproxy
haproxy_1 |   group haproxy
haproxy_1 |   daemon
haproxy_1 |   stats socket /var/run/haproxy.stats level admin
haproxy_1 |   ssl-default-bind-options no-sslv3
haproxy_1 | defaults
haproxy_1 |   log global
haproxy_1 |   mode http
haproxy_1 |   option redispatch
haproxy_1 |   option httplog
haproxy_1 |   option dontlognull
haproxy_1 |   option forwardfor
haproxy_1 |   timeout connect 5000
haproxy_1 |   timeout client 50000
haproxy_1 |   timeout server 50000
haproxy_1 | frontend default_frontend
haproxy_1 |   bind 0.0.0.0:80
haproxy_1 |   default_backend default_service
haproxy_1 | backend default_service
haproxy_1 |   balance roundrobin
haproxy_1 |   server APP 172.17.0.142:5000
haproxy_1 |   server EXAMPLE_APP_4 172.17.0.144:5000
haproxy_1 |   server EXAMPLE_APP_5 172.17.0.146:5000
haproxy_1 | INFO:__main__:Config file is updated
haproxy_1 | INFO:__main__:Launching haproxy
app_5     |  * Running on http://0.0.0.0:5000/ (Press CTRL+C to quit)
We could have used docker-compose up -d to not see all this noise. These logs are always available over docker-compose logs.
What does docker ps tells us now?
~/example$ docker ps
CONTAINER ID        IMAGE                  COMMAND                CREATED             STATUS              PORTS                         NAMES
408361dcfcf5        example_nginx:latest   "/bin/sh -c /start"    4 minutes ago       Up 4 minutes        443/tcp, 0.0.0.0:80->80/tcp   example_nginx_1
c65e22e7ebb6        tutum/haproxy:latest   "/run.sh"              5 minutes ago       Up 5 minutes        443/tcp, 80/tcp               example_haproxy_1
e36eb77a4d33        example_app:latest     "/bin/sh -c 'python    5 minutes ago       Up 5 minutes        5000/tcp                      example_app_5
c2a9bc9590da        example_app:latest     "/bin/sh -c 'python    5 minutes ago       Up 5 minutes        5000/tcp                      example_app_4
969dd58bc2e2        example_app:latest     "/bin/sh -c 'python    5 minutes ago       Up 5 minutes        5000/tcp                      example_app_3
e82aeb605c76        redis:latest           "/entrypoint.sh redi   5 minutes ago       Up 5 minutes        6379/tcp                      example_redis_1
It brought up our redis database, haproxy and nginx container. It also created 3 new containers for the web app, app_3,app_4 and app_5.
Docker-compose itself has a handy ps argument too.
~/example$ docker-compose ps
Name                    Command             State              Ports
-------------------------------------------------------------------------------------
example_app_3       /bin/sh -c python app.py      Up      5000/tcp
example_app_4       /bin/sh -c python app.py      Up      5000/tcp
example_app_5       /bin/sh -c python app.py      Up      5000/tcp
example_haproxy_1   /run.sh                       Up      443/tcp, 80/tcp
example_nginx_1     /bin/sh -c /start             Up      443/tcp, 0.0.0.0:80->80/tcp
example_redis_1     /entrypoint.sh redis-server   Up      6379/tcp
testing
Does the haproxy really work?
Is it balancing requests with the round robin algorithm?
Is our nginx proxy doing his job?
Will the redis database be reachable from our flask app?
So many questions, so let’s just try it out!
~/example$ curl localhost
Visit number 1
Hostname: 969dd58bc2e2
~/example$ curl localhost
Visit number 2
Hostname: c2a9bc9590da
~/example$ curl localhost
Visit number 3
Hostname: e36eb77a4d33
~/example$ curl localhost
Visit number 4
Hostname: 969dd58bc2e2
~/example$ curl localhost
Visit number 5
Hostname: c2a9bc9590da
~/example$ curl localhost
Visit number 6
Hostname: e36eb77a4d33
YAY IT WORKS

summary
Docker-compose can help us define a whole container orchestration in one single file. We don’t need anymore to start up containers in the right order and link them, docker-compose takes care of it now.
There is way more to know about it though. It comes with many options and arguments I haven’t yet read about.
But in hope I will find more time in future, I’m looking forward to try them out.
source of code example
You can find the whole example project on github.