So that brought me to the idea to add my container images, which I host on ghcr.io. But why do that?
The images are then searchable on ArtifactHub, but the one other cool feature is: you get a security report of your container image for free.
As an example, this very site, is running in a container. And I added the container image to ArtifactHub, which tells me now, I got a vulnerability on it:
This is very useful, right?
But how do you add your container images to ArtifactHub? Well first of all, create an account there. You can directly register with GitHub or Google, or use your email for registration:
Now you need to follow their instructions on how to label your container images properly so they can be shown on their site.
They support a whole lot of the opencontainers labels, but for starters these 3 labels are required for your image to even appear there.
io.artifacthub.package.readme-url
url of the readme file (in markdown format) for this package version. Please make sure it points to a raw markdown document, not HTMLorg.opencontainers.image.created
date and time on which the image was built (RFC3339)org.opencontainers.image.description
a short description of the packageBut as you are already adding labels to your images, please take the time and add the ones listed in the image-spec.
I set those labels in my CI/CD pipeline. And as all of my public repos are hosted on GitHub I end up doing this with GitHub Actions
Here is the action I’m using for setting the labels on my blog container image:
- name: Build and push
id: docker_build
uses: docker/build-push-action@v2
with:
context: ./
file: ./Dockerfile
push: $
tags: $
labels: |
io.artifacthub.package.readme-url=https://raw.githubusercontent.com/$/$/README.md
org.opencontainers.image.title=$
org.opencontainers.image.description=$
org.opencontainers.image.url=$
org.opencontainers.image.source=$
org.opencontainers.image.version=$
org.opencontainers.image.created=$
org.opencontainers.image.revision=$
org.opencontainers.image.licenses=$
As you can see, I’m having a hard time creating the readme-url
dynamically. I’ve not found a better solution yet.
For some standalone golang applications you might be using goreleaser. For such cases you can use this configuration for adding the right labels:
dockers:
- image_templates:
- "ghcr.io/eyenx/gursht:"
- "ghcr.io/eyenx/gursht:v"
- "ghcr.io/eyenx/gursht:v."
- "ghcr.io/eyenx/gursht:latest"
build_flag_templates:
- "--label=io.artifacthub.package.readme-url=https://raw.githubusercontent.com/eyenx//main/README.md"
- "--label=org.opencontainers.image.created="
- "--label=org.opencontainers.image.name="
- "--label=org.opencontainers.image.revision="
- "--label=org.opencontainers.image.version="
- "--label=org.opencontainers.image.source="
After you’ve done that, and your image was built, you need to manually add it once on ArtifactHub.
On the control panel you can add a repository. Chose “Container images” as a kind and fill out the form:
The image will be then listed in the control panel, and you’ll see any errors that might happen while checking it. Usually it takes up to 30 minutes to have the first import and security scan happening.
With the three dots menu of the image you are also able to copy a badge you could add on the README
of your repository, as I did for eyenx/blog.
In the next few weeks I’m planning to add all my container images on ArtifactHub, so that I’ve got the security scanning covered without having to host any scanning tooling myself!
You can see my progress by searching directly on ArtifactHub for eyenx.
]]>He showed us octoDNS a python tool from GitHub able to sync your local configuration with your DNS records managed at any thinkable cloud provider.
Until last weekend I was still using octoDNS to automatically manage my DNS on Azure through a CI/CD pipeline run with drone.
But I decided to switch to a different solution consisting of terraform and Digitalocean while keeping the pipeline on a self hosted drone server.
I created a main.tf
file and a separate file for every single DNS zone I want to manage:
main.tf
eyenx.ch.tf
example.com.tf
etc.
The contents of main.tf
will describe the provider we want to use (in this case digitalocean/digitalocean
), our API Token as variable and the remote backend s3
which will be a space/bucket on Digitalocean. We will use the backend to save our terraform.tfstate
.
terraform {
required_providers {
digitalocean = {
source = "digitalocean/digitalocean"
version = "2.0.1"
}
}
# DigitalOcean uses the S3 spec.
backend "s3" {
bucket = "mybucketname"
# filename to use for saving our tfstate
key = "terraform.tfstate"
# depends where you are setting up the space (fra1/ams1 etc..)
endpoint = "https://ams1.digitaloceanspaces.com"
# DO uses the S3 format
# eu-west-1 is used to pass TF validation
region = "eu-west-1"
# Deactivate a few checks as TF will attempt these against AWS
skip_credentials_validation = true
skip_metadata_api_check = true
}
}
# our digitalocean api token
variable "do_token" {}
provider "digitalocean" {
token = var.do_token
}
Our domain zone file will be kept very simple:
resource "digitalocean_domain" "examplecom" {
name = "example.com"
ip_address = "1.2.3.4" # default @ record
}
resource "digitalocean_record" "examplecom-mail" {
domain = digitalocean_domain.examplecom.name
type = "A"
name = "mail"
value = "1.2.3.5" # mail.example.com resolves to this IP
}
resource "digitalocean_record" "examplecom-mx" {
domain = digitalocean_domain.examplecom.name
type = "MX"
name = "@"
priority = 10
value = "mail.example.com." # MX record
}
resource "digitalocean_record" "examplecom-www" {
domain = digitalocean_domain.examplecom.name
type = "CNAME"
name = "www"
value = "@" # CNAME record www.example.com > example.com
}
resource "digitalocean_record" "examplecom-txt-keybase" {
domain = digitalocean_domain.examplecom.name
type = "TXT"
name = "_keybase"
value = "keybase-site-verification=SECRETCODE" # keybase verification TXT record
}
resource "digitalocean_record" "examplecom-srv-imap-tcp" {
domain = digitalocean_domain.examplecom.name
type = "SRV"
name = "_imap._tcp"
value = "mail.example.com." # SRV record for imap
port = "143"
priority = 0
weight = 1
}
What we now need is a init, plan & apply to finish this up. But first we will have to export our secrets
export TF_VAR_do_token=SECRET_API_TOKEN
# has nothing to do with AWS, it's still Digitalocean, but terraform's s3 backend reads this
export AWS_ACCESS_KEY_ID=KEY_ID_FOR_ACCESS_TO_DO_SPACE
export AWS_SECRET_ACCESS_KEY=ACCES_KEY_FOR_ACCESS_TO_DO_SPACE
terraform init
Initializing the backend...
Initializing provider plugins...
- Using previously-installed digitalocean/digitalocean v2.0.1
Terraform has been successfully initialized!
You may now begin working with Terraform. Try running "terraform plan" to see
any changes that are required for your infrastructure. All Terraform commands
should now work.
If you ever set or change modules or backend configuration for Terraform,
rerun this command to reinitialize your working directory. If you forget, other
commands will detect it and remind you to do so if necessary.
terraform plan
[...]
digitalocean_record.examplecom-www: Refreshing state...
digitalocean_record.examplecom-mail: Refreshing state...
digitalocean_record.examplecom-mx: Refreshing state...
[...]
Plan: 6 to add, 0 to change, 0 to destroy.
terraform apply # confirm with yes
After applying the changes, please check that your terraform.tfstate
has been uploaded to the Digitalocean space and check if the DNS is actually working:
host example.com
example.com has address 1.2.3.4
Let’s automate this by running a pipeline with drone. You can of course use any other CI/CD pipeline tooling you want to. For the main step in the pipeline we’ll be using the hashicorp/terraform container image.
Example .drone.yml
:
kind: pipeline
type: docker
name: dns
steps:
- name: terraform
image: hashicorp/terraform:0.13.4
commands:
- terraform init
- terraform plan
- terraform apply -auto-approve
# keep your secrets secret and not inside GIT!
environment:
TF_VAR_do_token:
from_secret: tf_var_do_token
AWS_SECRET_ACCESS_KEY:
from_secret: aws_secret_access_key
AWS_ACCESS_KEY_ID:
from_secret: aws_access_key_id
when:
branch: master
This way any time you push a new change to your master branch, the pipeline will take care of the rest.
And thanks to the remote backend being configured, you’ll be able to also apply your changes manually, from any device.
]]>Isso is a very lightweight commenting server you can host yourself, and the cool thing is, it even allows you to import comments from other providers like Disqus or Wordpress.
In this post, I will quickly show you how I migrated to Isso in a matter of minutes!
Head out to your Disqus dashboard. Login in to the admin interface and you’ll find an export button. It should be available under the URL Path: /admin/discussions/export
.
You can then start an export and wait for the download link you’ll get per mail.
The download is hosted on the domain https://media.disqus.com which had a expired SSL certificate for me:
openssl s_client -connect media.disqus.com:443 <<< QUIT | openssl x509 -noout -enddate
depth=2 C = US, O = DigiCert Inc, OU = www.digicert.com, CN = DigiCert Global Root CA
verify return:1
depth=1 C = US, O = DigiCert Inc, CN = DigiCert SHA2 Secure Server CA
verify return:1
depth=0 C = US, ST = California, L = San Francisco, O = "Disqus, Inc.", CN = *.disqus.com
verify error:num=10:certificate has expired
notAfter=Apr 27 12:00:00 2020 GMT
verify return:1
depth=0 C = US, ST = California, L = San Francisco, O = "Disqus, Inc.", CN = *.disqus.com
notAfter=Apr 27 12:00:00 2020 GMT
verify return:1
DONE
notAfter=Apr 27 12:00:00 2020 GMT
As we are migrating away from this provider, it doesn’t matter to us:
curl https://media.disqus.com/uploads/exports/your/download/url/you/got/per/mail.xml.gz -o disqus.xml.gz
gunzip disqus.xml
You’ll need a subdomain with the sole purpose of hosting your commenting server. A.e isso.domain.tld
.
After that, I headed to Isso’s GitHub repository and build a Docker image for the server
git clone github.com/posativ/isso
cd isso
docker build . -t isso
FYI: I’m planning to automate the build, as I only found some old images on Docker hub and usually use newer images. I’ll share the image URL as soon as I set up the CI build.
Now let’s set up our directories to hold the database (SQLite) and the isso.cfg
file:
mkdir /myissoinstance/config
mkdir /myissoinstance/db
The isso.cfg is a really easy to configure file. This is a template of mine:
[general]
dbpath = /db/comments.db # where the db is located at
host = # allowed hosts to use the server
http://domain.tld
https://domain.tld
https://otherblog.domain.tld
http://localhost:8080/
notify = smtp # notify per mail
[smtp] # mail notification configuration
username = isso@domain.tld
password = mailpasswordsaredumb
host = mail.domain.tld
port = 587
security = starttls
to = me@domain.tld
from = isso@domain.tld
timeout = 10
[guard] # spam guard
enabled = true
ratelimit = 2
direct-reply = 3
reply-to-self = false # some of this stuff can be overridden with the clien configuration
require-author = true
require-email = false
[markup] # what options can be used on the client-side
options = strikethrough, superscript, autolink
allowed-elements =
allowed-attributes =
[admin] # wether to have the /admin interface enabled or not
enabled = true
password = THEVERYSECRETPASSWORD
Put it inside /myissoinstance/config/isso.cfg
and also put your disqus.xml
under /myissosinstance/config
. Now it’s time to import your Disqus comments:
docker run -it --rm -v /myissoinstance/config:/config -v /myissoinstance/db:/db isso -c /config/isso.cfg import /config/disqus.xml
A database should now be available under /myissoinstance/db
and you should see, that there is something inside it:
sqlite3 /myissoinstance/db
sqlite> select count(*) from comments;
18
Wow, all this fuss for 18 comments. But that is me. You might as well have 1800 comments as far as I know.
Now it’s time to make it run indefinitely with docker-compose.
I use traefik as my reverse proxy and have to configure this to make https://isso.domain.tld
available:
version: '3.3'
services:
app:
image: isso
networks:
- default
volumes:
- /myissoinstance/config:/config
- /myissoinstance/db:/db
restart: always
labels:
- "traefik.frontend.entryPoints=http,https"
- "traefik.port=8080"
- "traefik.backend=myissoinstance_app"
- "traefik.frontend.rule=Host:isso.domain.tld"
networks:
default:
external:
name: docker
You could make it also available with any other reverse proxy, but the main thing here is, to be able to head to https://isso.domain.tld (or with /admin if the administration panel is active) and find your Isso instance.
Now it’s time for the client configuration, or in other words, the configuration of javascript on your blog post.
There is a whole documenation page dedicated to it.
For my part it was pretty easy. Just include this block at the end of your posts:
<div class="block">
<script data-isso="https://isso.domain.tld/" data-isso-require-author="true" # overwriting spam guard preferences data-isso-avatar="false" src="https://isso.domain.tld/js/embed.min.js"></script>
<section id="isso-thread"></section>
</div>
I tested it out first on localhost and then deployed it to PROD. This way I saw that there was a problem with one of the comments which gave back a 500 internal server error
and also, that my blog post scheme had changed.
I’ve been using trailing slash in my blog post URI for quite a while now, and Disqus was handling this without problems. But Isso isn’t. If my blog post requested the comments for a post with a trailing slash, it didn’t receive any comments back from Isso as there wasn’t a blog post registered in the database (after the import from Disqus) with trailing slash.
The easiest fix for me was obviously to read the whole code of Isso and create a pull request on Github to fix this, NOT. I’m no superman. I just used sqlite
and added a trailing slash to all my registered blog post inside the Isso database. But perhaps some folks out there might want to take a look at this.
This was quite a big change for only hosting 18 comments IMHO. But I’ve got now a good feeling about it because I’m not hosting the comments somewhere on a third party provider anymore, but have them under my complete control.
I created a repository to automatically build Isso in a container. It will be available under eyenx/isso.
]]>It didn’t took me too long, to find out there is the XMonad.Util.NamedScratchpad
package which can be used to set up a number of scratchpads running different applications.
First of all, import the package in your xmonad.hs
import XMonad.Util.NamedScratchpad
Now we just need to write following code block to configure some scratchpads. As an example, I’ll set up 3 different scratchpads.
-- scratchPads
scratchpads :: [NamedScratchpad]
scratchpads = [
-- run htop in xterm, find it by title, use default floating window placement
NS "taskwarrior" "urxvtc -name taskwarrior -e ~/bin/tw" (resource =? "taskwarrior")
(customFloating $ W.RationalRect (2/6) (2/6) (2/6) (2/6)),
NS "term" "urxvtc -name scratchpad" (resource =? "scratchpad")
(customFloating $ W.RationalRect (3/5) (4/6) (1/5) (1/6)),
NS "pavucontrol" "pavucontrol" (className =? "Pavucontrol")
(customFloating $ W.RationalRect (1/4) (1/4) (2/4) (2/4))
]
I will make use of the classname
or resource
of the window metadata to map them correctly. You can find out about those informations with a tool like xprop
.
xprop | grep WM_CLASS
Now you only need to select a window to find out it’s WM_CLASS
.
The last thing to do is to set up the keybindings and add the scratchpads to the manageHook
:
-- scratchPad term
, ("M-S-\\", namedScratchpadAction scratchpads "term")
-- scratchPad taskwarrior
, ("M-S-t", namedScratchpadAction scratchpads "taskwarrior")
-- scratchPad pavucontrol
, ("M-v", namedScratchpadAction scratchpads "pavucontrol")
main = do
xmonad $ def {
,manageHook = (myManageHook <+> namedScratchpadManageHook scratchpads
}
See my xmonad.hs for more details.
As you can see from my gif, the terminal I am using is URxvt. All of my terminals will have the Classname URxvt
so it seems impossible to get a named scratchpad working with a terminal running a specific application (a.e. Taskwarrior), because all URxvt
terminals will have the same WM_CLASS
.
This is where the -name
parameter comes into play. Thanks to this additional parameter a specific name get’s set as additional WM_CLASS
and I can use it to identify my scratchpads.
At last you should consider making usage of XMonad.StackSet.RationalRect
:
import XMonad.StackSet as W
This gives you the ability to predefine the structure of the window geometry of your scratchpads.
This means, RationalRect (3/5) (4/6) (1/5) (1/6)
would start drawing my scratchpad window at 3/5 of my x axis, and at 4/6 of my y axis. The window will then be 1/5 of my x axis in width and 1/6 of my y axis in height. This is super useful if you aren’t using the same resolution all the time.
Read more about RationalRect
here and don’t hesitate to contact me if something is unclear. I’m no Haskell or XMonad expert, but I’ll do my best to help you out.
“Oh yet another chat tool? I’ve got telegram running and I’m fine”, you might think. BUT Matrix isn’t quite the same. It’s decentralized, meaning there isn’t a central server. And it is also federated and of course: opensource.
You can thing of it like XMPP in the good old days. Does anybody used that? Oh yeah… me. You set up your own server, you create an account on your server, but are able to crosschat with other homeservers or the official matrix.org homeserver thanks to federation.
What you’ll need to follow this tutorial:
This is the docker-compose.yml
I am using to run synapse, the matrix homeserver:
version: '3.3'
services:
app:
image: matrixdotorg/synapse
restart: always
volumes:
- /var/docker_data/matrix:/data
labels:
- "traefik.frontend.entryPoints=http,https"
- "traefik.port=8008"
- "traefik.backend=matrix_app"
- "traefik.frontend.rule=Host:matrix.my.host"
The image I am using is: matrixdotorg/synapse.
But before you can fire up this docker-compose
file you’ll need to first generate a configuration, as explained in their README.md
docker run -it --rm -v /var/docker_data/matrix:/data -e SYNAPSE_SERVER_NAME=matrix.my.host -e SYNAPSE_REPORT_STATS=yes matrixdotorg/synapse:latest generate
After generating the configuration, you can modify it at your will. Just go to /var/docker_data/matrix/homeserver.yaml
and get your $EDITOR
going.
At last, fire up your instance with docker-compose up -d
Well the first thing I was missing after heading to https://matrix.my.host is a way to register my username.
Two ways of doing that:
enable_registration: true
in your homeserver.yaml
and docker restart matrix_app_1
docker exec -it matrix_app_1 register_new_matrix_user -u myuser -p mypw -a -c /data/homeserver.yaml
If setting enable_registration
to true is used, be sure to set it back to false after registering your user if you do not want people to register on your homeserver.
Just head to riot.im and login or register a user, by using an alternate homeserver and setting your homeserver FQDN.
But what is riot? It’s just one of the matrix client. You could even host your own instance or use another client.
Well this should work out of the box right? Well not exactly. We need federation to work, so we are able to join other channels on other homeserver and chat privately with people using other homeserver.
As explained in the docs, federation works by connecting to your homeserver through port 8448. But we do not want to make port 8448 publicly available, what now?
Also we are using a subdomain to make our matrix homeserver available (matrix.my.host) but we wan’t our username to look like this: myuser@my.host
and not like this: myuser@matrix.my.host
.
Well there is a solution for these two problems:
In some cases you might not want to run Synapse on the machine that has the server_name as its public DNS hostname, or you might want federation traffic to use a different port than 8448. For example, you might want to have your user names look like @user:example.com, but you want to run Synapse on synapse.example.com on port 443. This can be done using delegation, which allows an admin to control where federation traffic should be sent. See delegate.md for instructions on how to set this up.
Taking a look at delegate.md explains quite a lot:
The URL https://
Okay, so we set up a static file on our matrix.host
under .well-known/matrix/server
giving this JSON
back:
{ "m.server": "matrix.my.host:443" }
and we are good.
The last thing we will need to do is start from scratch. Yes, we will delete all data under /var/docker_data/matrix
and change the base_domain
in our generate command:
docker run -it --rm -v /var/docker_data/matrix:/data -e SYNAPSE_SERVER_NAME=my.host -e SYNAPSE_REPORT_STATS=yes matrixdotorg/synapse:latest generate
This is needed, as we need to recreate keys and also users. Of course you could start right away with this, but I wanted to show all the modifications I had to do to get this thing running. If you do not need federation however, and want to chat only to users from your homeserver, this step is of course not needed.
I also wanted to verify my mail address. I thought this would be fairly easy, just set up a mailaccount for matrix and configure it in your homeserver.yaml
:
email:
smtp_host: mail.my.host
smtp_port: 587
smtp_user: "matrix@my.host"
smtp_pass: "thisisapassword!"
require_transport_security: true
notif_from: "Your Friendly %(app)s homeserver <noreply@my.host>"
Well not quite. There is a bug. Synapse only tries to use TLS1.0 and some mailservers may reject that, like mine. There is already an open issue to this problem.
So I thought to myself: “Why not use a workaround?”
Just set up a second container, with a postfixforwarder in it, who will connect to my mail server using TLS > 1.0 and deliver the mails. Synapse can then connect to this docker container without auth and without TLS.
But please, be sure this container runs on the same server and is only accessible through the container network. We do not want to make port 25 of this container publicly available.
I used juanluisbaptiste/postfix for this.
After modifying my docker-compose.yml
:
version: '3.3'
services:
app:
image: matrixdotorg/synapse
restart: always
volumes:
- /var/docker_data/matrix:/data
labels:
- "traefik.frontend.entryPoints=http,https"
- "traefik.port=8008"
- "traefik.backend=matrix_app"
- "traefik.frontend.rule=Host:matrix.my.host"
postfixfwd:
image: juanluisbaptiste/postfix
restart: always
environment:
- SMTP_SERVER=mail.my.host
- SMTP_USERNAME=matrix@my.host
- SMTP_PASSWORD=thisisapassword!
- SERVER_HOSTNAME=postfixfwd.my.host
and of course the homeserver.yaml
:
email:
smtp_host: matrix_postfixfwd_1
smtp_port: 25
# no authentication needed
#smtp_user: "matrix@my.host"
#smtp_pass: "thisisapassword!"
#require_transport_security: true
notif_from: "Your Friendly %(app)s homeserver <noreply@my.host>"
I just had to restart synapse again and after that fire up the postfix forwarder container: docker-compose up -d
Now I was able to send mails through my matrix server and verify my mailadress.
I am the only user on my matrix homeserver, but am able to join matrix.org chat rooms. I recently started chatting with appservice-irc:matrix.org
too. This bot enables you to join IRC chat rooms on the freenode.net
network.
Some useful commands there:
!help
!join #myroom
!listrooms
This is very useful, as I can easily follow up on IRC with my smartphone. Yeah, there is riot.im app for Android.
If you managed to get synapse and federation working with this tutorial, I would appreciate if you would contact me. Of course you should do that through matrix: @eyenx:eyenx.ch
I went through the schedule and bookmarked the most suited talks for me, while knowing that this won’t be a fixed program as rooms get pretty full and I’ll have to have a second plan ready.
My day starts with the welcome talk in Janson. The room is nearly full. The rules get explained by the staff and after a short introduction we get to the real talks.
I get as quickly as possible in the containers devroom. I know leaving and entering this room again will be really hard, as it attracts an enormous amount of people.
Sascha Grunert presents us Podman with some cool slides and I have already some takeaways from it.
As an example you can share PID namespaces with podman between containers
podman run --pid container:containername --name myname -d alpine
Podman, as the names tells us, can create even pods on a single node:
podman pod create --name mypod
We can than start a new container inside this pod
podman run --pod mypod alpine command
And from that, we can generate kubernetes manifests:
podman generate kube -f pod.yml mypod
and obviously replay those inside podman:
podman play kube pod.yml
Akihiro Suda is the next guy showing up in the container devroom. He shows us some interesting new way of running container images, by downloading first what is really needed by the container so that it can start up faster. It reduces start up time of a container by a factor of 5.
The project is based on stargz (seekable tar.gz) from Brad Fitzpatrick (Ex-Googler). The idea behind it is having an index.json inside the archive to make a direct search of files possible.
The plugin is available here.
I get out of the container devroom to go to building AW and listen to some talks on collaborative applications. The first one is the ONLYOFFICE team showing up and explaining to us how it’s application works and how well they can be integrated into Nextcloud.
They also talk about how many features they still want to implement. I didn’t even know it was possible to have such a big feature list for a collab app.
Nextup is Nextcloud regarding it’s new HUB feature, where they install all default applications (mail, calendar etc.) by default. This video recaps the talk pretty good.
Yes, I’m back in the container devroom again. This time it was pretty hard to get in, as the queue was very long, but in the end, I succeeded.
Thanks to CRIU and Adrian Rebers talk I know now how to live migrate a container from one host to the other (with it’s memory!)
Go check the recording of the talk out, as he has also a demo in it.
Hint: there is a podman container checkpoint
command
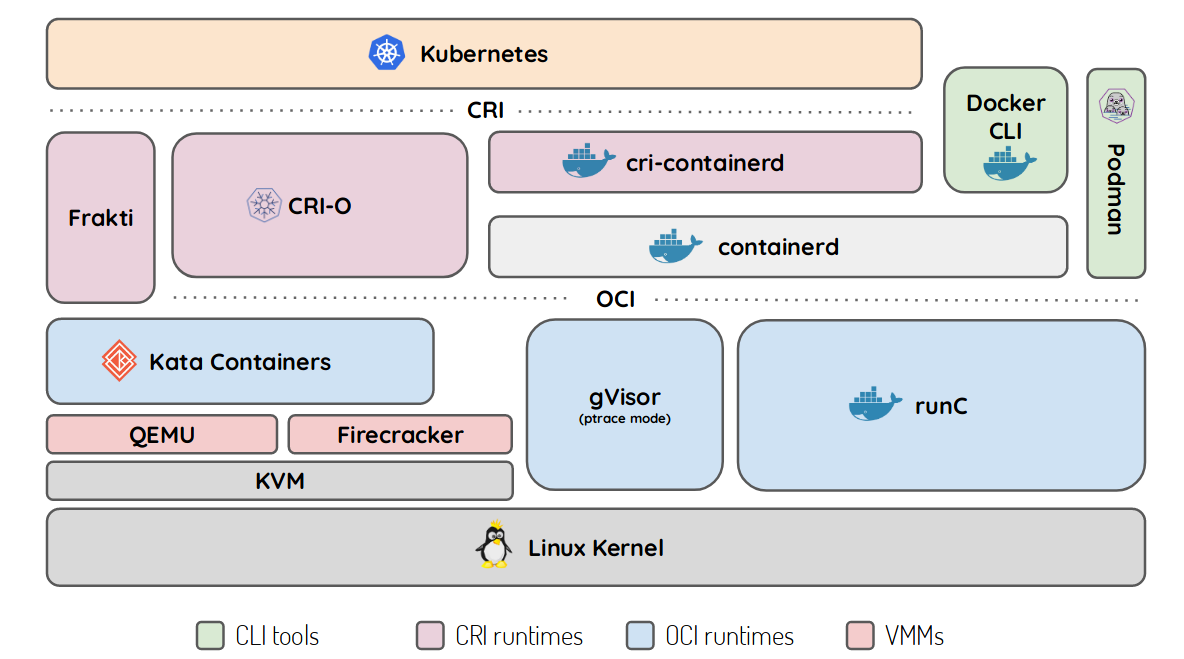
Thierry Carrez started drawing a dashboard some years ago to show how K8s works to make containers run. He started adding stuff as CRI and OCI came along and the final drawing he ended up with, is quite helpful for some folks.
Matteo Valentini shows us that Kubernetes isn’t always the solution to a problem. With his toolchain consisting of Git, Terraform, Ansible and Packer he convinces us how easy it is to have immutable deployments and go for an approach of a full CI/CD pipeline, starting by building a cloud image with Packer and Ansible and deploying it to the cloud with Terraform.
Go check out is (not yet documented) GitHub repo.
Kris Nova. This is the highlight for me. The room in building K is already quite full as I get in. Over 800 people will be listening to her.
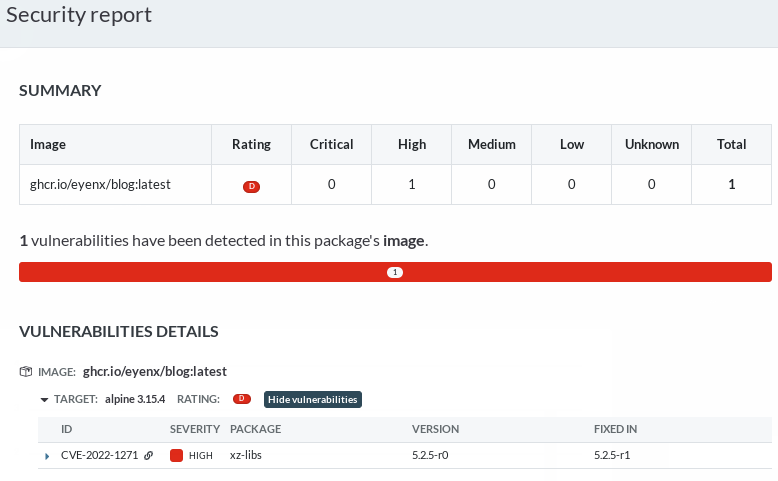
She gets quite technically and hacks during her 50 minutes talk a Kubernetes cluster as a normal cluster user. By using a privileged container, she manages to gain control of the whole Kubernetes cluster as cluster admin. The solution? With Falco you could prevent that from happening. The talk is quite interesting and she gets a big applause at the end. Well done! Everything is obviously available on her GitHub.
No, this time I’m not ending up in the container devroom again. It’s the security devroom. Lukas Vrabec informs us on generating SELinux policies for container with a new project called Udica. Thanks to this tool generating SELinux policies for our container will be as easy as eating cake (but I’d still rather have cake than SELinux policies).
This two commands make it look pretty easy:
podman inspect -l | udica my_container
semodule -i my_container.cil
For the end of the day Winfried Tilanus gives a talk regarding the challenges we’re confronted when trying to get end to end encryption for instant messaging. Spoiler: it’s not that easy.
His slides are available here.
Last but not least, Mr Czanik is up, and I can profit quite a lot from his talk. Sudo can do a lot more than just give you root access to a system. Some plugins and his demo on how sudo can also be run in pair programming/engineering gets a good round of applause.
Go check it out!
I start my day by joining the decentralized internet and privacy devroom. I will be staying in here a lot today. The first talk is about closing the lid of your laptop and actually encrypting the HD again (Encrypt on suspend). The talk gets quite technical but basically, the processes get freezed and memory saved to disk before the encryption happens. It’s quite a hack and not at all stable, but it works.
This time, the code is hosted on debian.org.
Wow, a decentralized identity tool! Today I will be seeing a few of those. Identity box is a little different than the others, because it comes with hardware. The demo even works well and shows us how to add a new friend to identity box. At this point I wish people were more alert about their privacy and would want something like this in their homes. Their homepage promises a lot.
I switch the room and stand in line to enter the monitoring and observability track. Andrej Ocenas shows us how to correlate Loki logs with Grafana metrics and link those to traces in Jaeger and viceversa. Quite interesting to me. With this linking possiblity you get from traces to metrics and from there to logs and back very easy. Go look at his talk, he has a demo!
I listen to another talk but continue my journey back into the p2p & privacy devroom.
As I said, another federated identity provider. This time it’s ID4me which is basically doing openID but federated.
Their homepage says it all.
Well, this are the talks I was waiting for. GNUNet. I’m so much into decentralized internet solutions, that I can’t decide which one is the best. As an example, I’m a weekly user of ZeroNet but GNUNet was something new for me.
It’s setup really easy on ArchLinux as there is a package for it. Martin Schwarzenbach shows us what where the challenges building this and what approach they took. I would love if this would fire up and a lot of apps would be built on it! The talk is really promising.
P2P IoT! Why should we trust the cloud to control our lights, music boxes and doors in our home? This is where peer-to-peer IoT comes into play. And why not built it on GNUNet? Yes this looks to amazing to be true. But this guy, Devan Carpenter, had the idea. It’s not yet fully realised but he’s getting there! Wow, can’t w8 to try it out.
No, I’m not switching room again. It’s getting too full to switch room quickly. And then I don’t want to miss the next talks in this devroom. So,opening up my laptop it is. Watching the stream of another devroom won’t hurt. The talk of Alexander Trost goes on about rook and it’s development. Very very interesting where this guys are heading. Go check them out!
Of course I already knew DAT before going to Belgium. I even used it a few times. The only thing I’m missing on DAT is the multiwrite capability, but they are getting there. DAT is a protocol which gives you a very easy way to share files p2p from one client to another. Heck, it even gives you the possibility to host your webpages on the DAT decentralized web. Some browser even support browsing dat:// sites. It’s kinda like ipfs but a few aspects are different.
The Tor project needs developers. This is my main take from next talk. Alexander Færøy presents us the Tor organisation and how the teams are built. Shows us some statistics too, but the main objective of this talk is to get people to help out on the project. If you know C (I don’t) please go help or at least think about donating.
Why rely on Google to do the hole notification push thingy? This man has a point! If your Android apps have to use a proprietary software to push notifications it’s not FOSS anymore. This is why he takes the matter into his own hands and builds the OpenPush project. By the way, you should check out is homepage, he offers a lot of services if you know him.
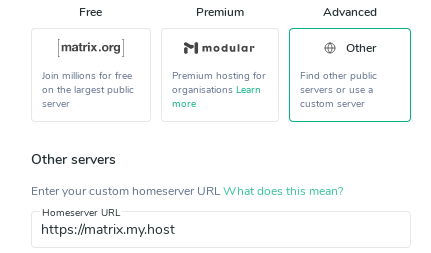
The room is full. What a surprise, the next talk is regarding Matrix. But this time we will be looking at the next-gen Matrix. What if you can have your homeserver on your device at any time? This means being fully peer-to-peer and not having to rely anymore on a self hosted home server. Well, that would be the dream. And the guys from Matrix are on this path. They even have a demo already out there working.
The idea was to try it out with the devroom, buy downloading a docker image and starting a go binary in the background we should be able to connect with Matthew Hodgson, who gave the talk. It didn’t work for me, as we were using a different, hotspot network I couldn’t reach from the middle of the room (apparently there were some multicast issues with the FOSDEM network).
Go check out his recording to see how cool it would be.
I’m free! That is the feeling you get leaving a full room. I go back to building H and join the Red Hat guys to let me introduce to the new Red Hat Container Storage on OpenShift 4.x which is basically Rook with a Ceph Backend.
The idea is to deploy this on OpenShift itself. I would never deploy software defined storage in containers, but as it is managed by an operator from Red Hat, I will trust them. I had a lot to do with OpenShift 4.x and it looks like they got this operator thingy working for them. No installs broke until yet, and all updates went through in the end. It looks like they built a very robust Kubernetes platform with OSCP 4.x.
To get Ceph now running, you bootstrap a few new nodes (on the cloud or baremetal) and define them as storage only. No other applications will run on them. Then the Operator takes over from there and deploys all Rook/Ceph components on them, in containers. I even asked if you could attach to the operator a pre-existing baremetal Ceph installation. And their answer was: “not yet, but we want to get there”.
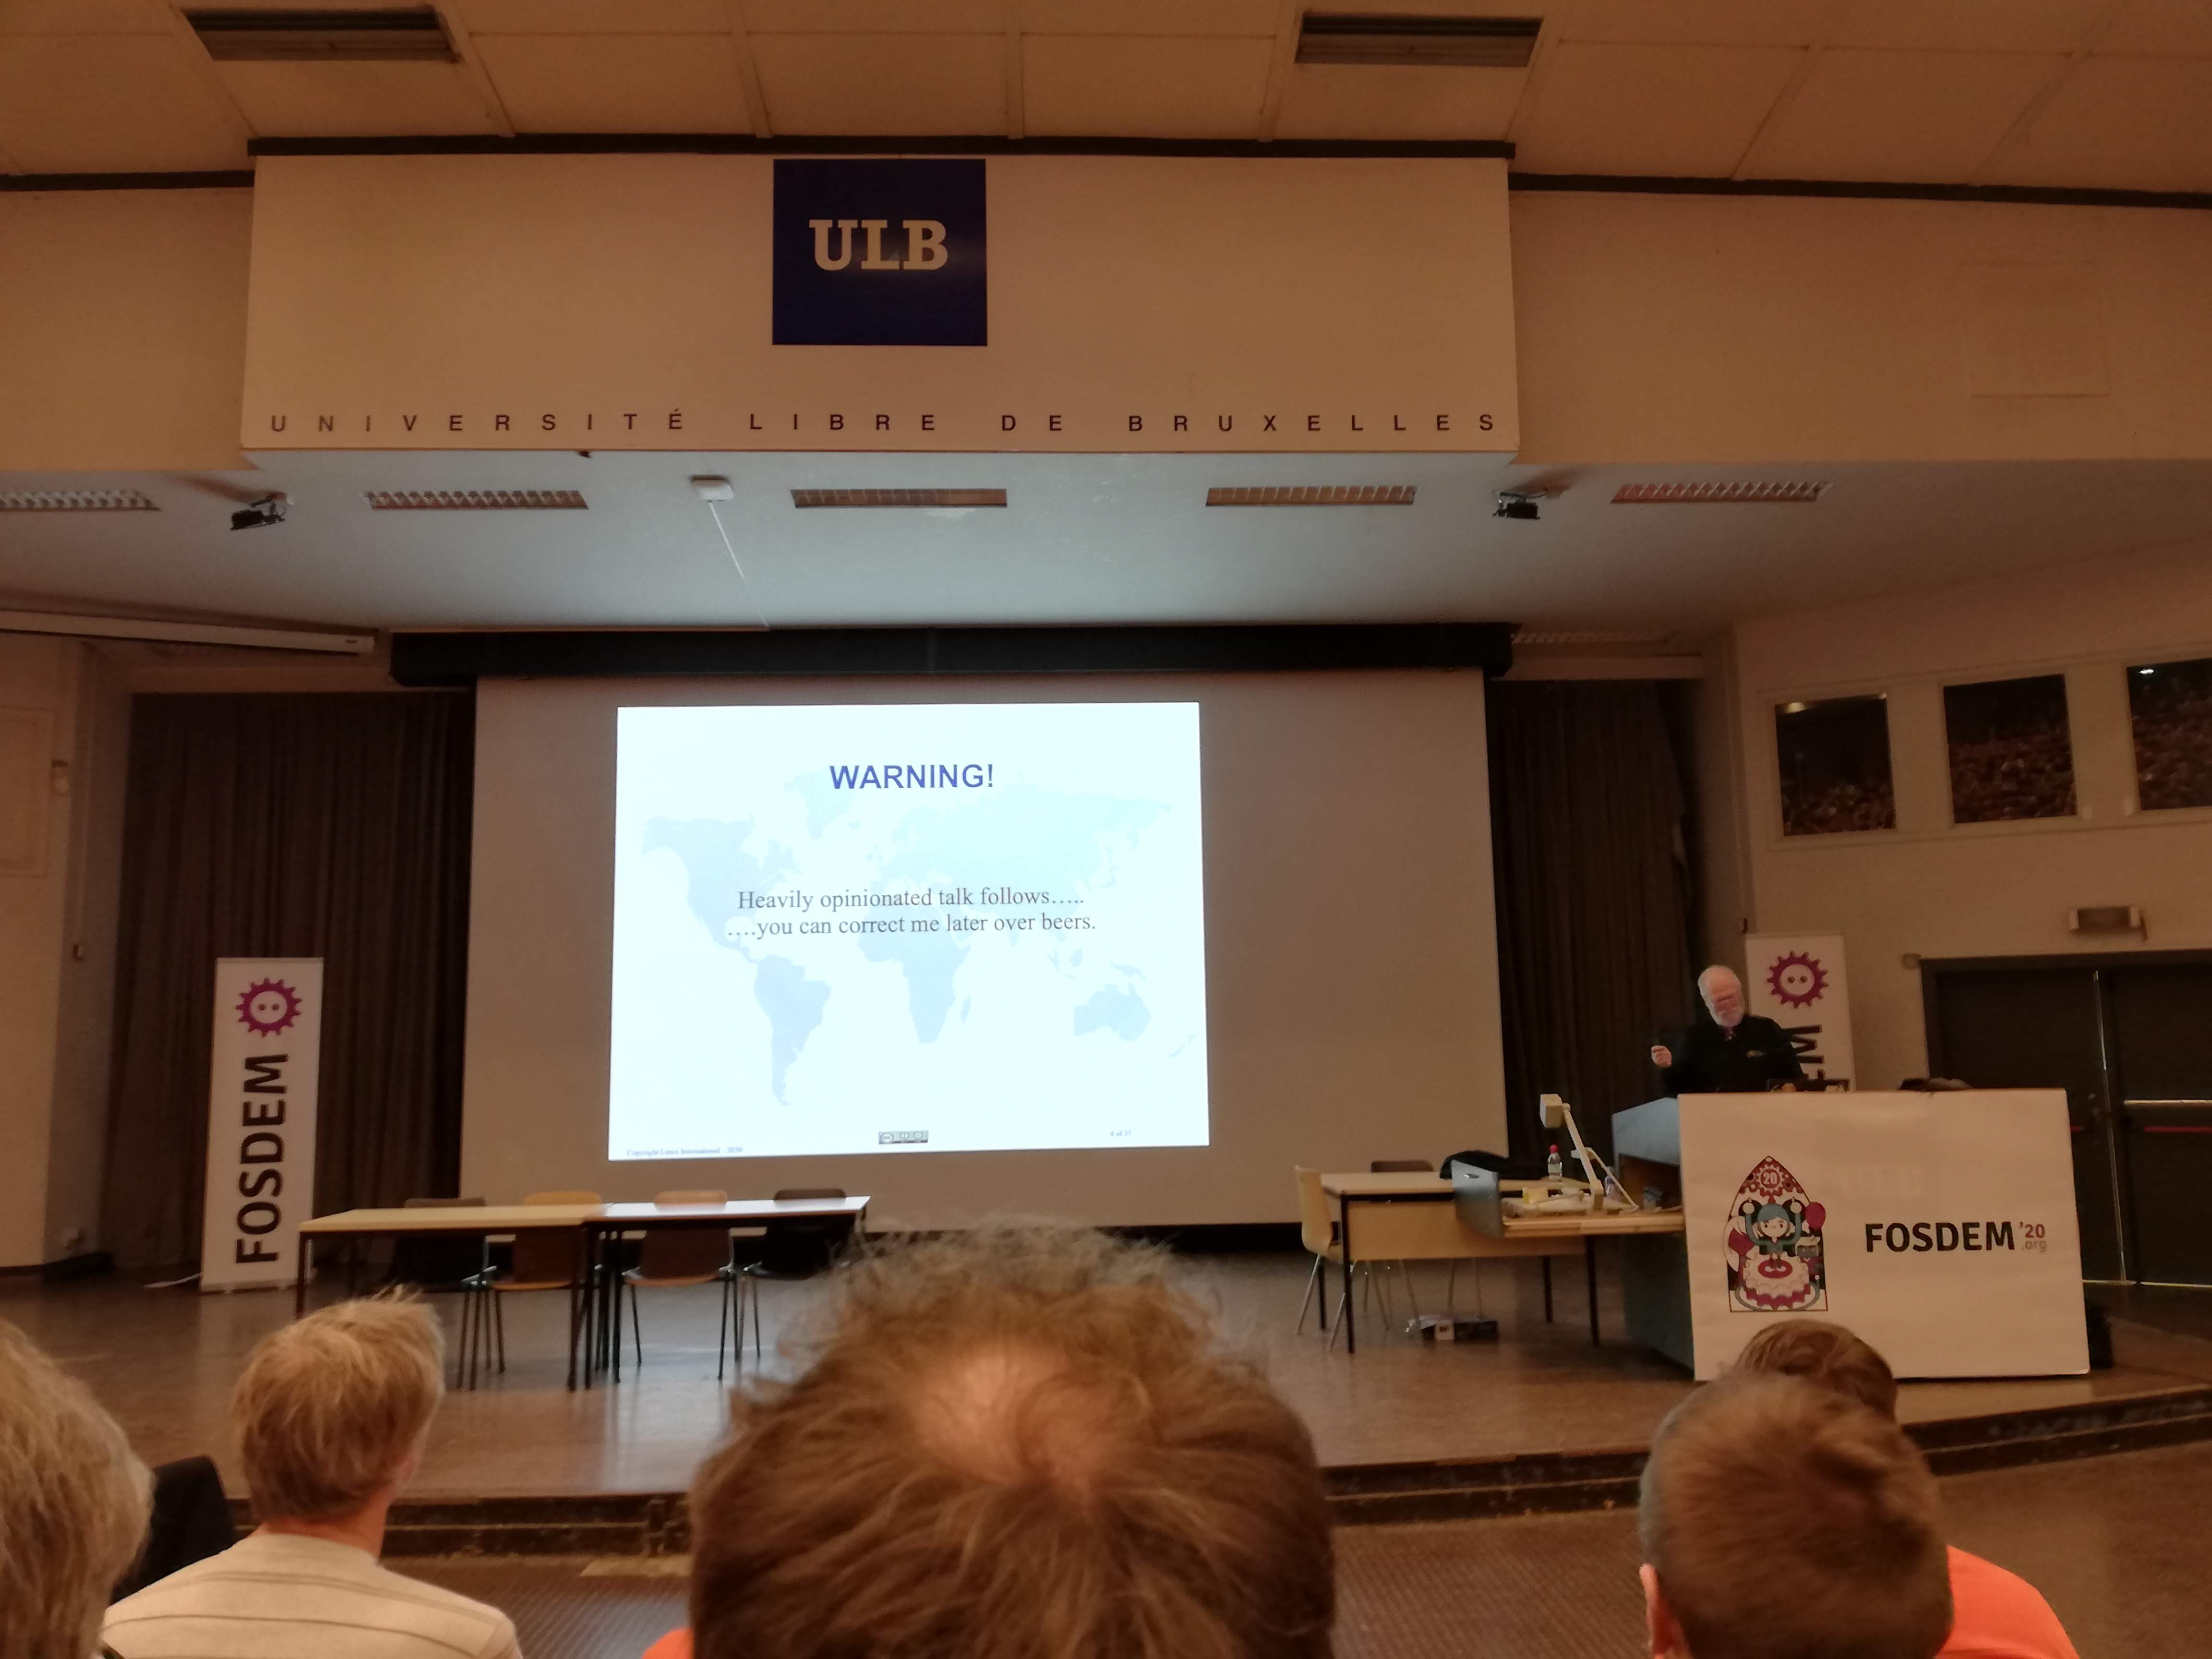
And it’s already Sunday 4 PM. Time to get back into Janson and listen to the great Jon ‘maddog’ Hall. This guy is extraordinary! Last year I was nearly crying at the end of his talk. He always has way too many slides and way too many side jokes ready to entertain us.
This year he shows us what it was back in the day to work for FOSS, and how hard it was to make money out from it. I realize how lucky we are today. Opensource software is recognized that much and enterprises all over the world want to work with said software. But back in maddog’s early years, that wasn’t the case. Jumping from one lawsuit to the next he showed us what where the main events from the years 1970 - 2020.
Go checkout out the recording, it will be surely worth a look!
And there comes also Steven Goodwin into play. 19 attended FOSDEM and counting. This guy saw it all and presents us also the one guy who started it all. Raphael Bauduin. Who is in fact wearing the same shirt he wore at the first FOSDEM. What a bunch of nerds, I think for myself. Well I’m one too sitting here with my notebook full of stickers and copyleft hoodie.
The Staff presents to us ,without the beamer, as it had malfunctioning, the facts and numbers of this year’s FOSDEM. This is always nice to listen too, as it shows us how much time and money goes into such a project. At this point I just want to say thank you to all volunteers. We’ll see each other next year! PS: perhaps I’ll finally be able to grab a hoodie next time!
]]>In a world where Slack, Mattermost and Matrix are words being said out loud by non-techie people, there are still people who love the internet relay chat protocol (there, you don’t need to google it now).
It’s simple, it can’t do threads, no images or memes are being sent around, it can’t do emoji out of the box BUT I love it because it’s reliable and easy to manage.
Yet, in a world where being 24/7 online is the case, how can you manage being notified on highlights if you aren’t always constantly looking to your terminal? How can you be notified when you are travelling and are only on your mobile?
Yes, there are a lot of notifying implementation for your localhost irssi or weechat client, and there are some IRC cloud providers giving you the possibility to be notified even when you are on the loo.
But how can one manage notifications if you are running your IRC client in a fricking container on your standalone server?
I came across yet another Go project named: Gotify, a notifier server for the new age. It’s quite simple to run and it’s thought to be run in a container.
sudden docker-compose.yml appears
version: '3.3'
services:
app:
image: gotify/server
restart: always
networks:
- default
volumes:
- ./data/:/app/data
ports:
- "8080:80"
The default username:password combination is “admin:admin”. Once logged in you can find client and apps and change your password
Clients are for reading or receiving notifications by using WebSockets. Your browser should already be a client by now.
Apps are the sending components of notifications. In our example: weechat.
After setting the gotify server up, we now need to configure weechat to send notifications to it, as an app.
We create a new app named “weechat” in our gotify server and CTLR+C
the token.
For sending IRC notifications, weechat needs to use a plugin named weechat-gotify DOH.
When the plugin is loaded the only two configuration variables that need to be changed are:
/set plugins.var.python.gotify.host https://mygotify.server
/set plugins.var.python.gotify.token MYSECRETTOKEN
After that, the notifications should arrive at the server and can be seen in your browser.
Now we need something to read this stuff. There is an Android App for connecting to your gotify server and receive notifications for it.
But what about our workstation? We are not on the browser at all time (or are we?)
For this problem, I searched a lot. I wanted to read the WebSocket stream from the gotify server and send new messages via notify-send.
After a while, I decided to write a python script myself.
I just needed three modules: websocket DOH, json (to load the message object) and notify2 (send notifications from python).
And this is the easy script that came out of it:
#!/usr/bin/env python3
import json
import notify2
import WebSocket
def notify(text):
notification = notify2.Notification(text)
notification.show()
def on_message(ws, message):
notify(json.loads(message)["message"])
def on_error(ws, error):
notify(error)
def on_close(ws):
print("### closed ###")
def on_open(ws):
print("### open ###")
if __name__ == "__main__":
notify2.init('gotify-send')
websocket.enableTrace(True)
ws = websocket.WebSocketApp('wss://mygotify.server:443/stream',
header={"X-Gotify-Key": "MYSECRETTOKEN"},
on_message=on_message,
on_error=on_error,
on_close=on_close)
ws.on_open = on_open
ws.run_forever()
The Token to be used here is a new custom “Client” one. Like the one from your browser.
Well, the only thing remaining was testing it. There are three possibilities to do this:
I’m late, I know, very very late.
I just didn’t find the time to look at docker-compose for real. I really was busy.
docker-compose is the replacement for the old project fig, which is now deprecated.
Kinda liked the name fig. But that’s perhaps because I love to eat some dried figs, especially before a run.
docker-compose helps you orchestrate your containers. Which means you can define your application environment with one simple YAML file.
Afterwards you are able to start up all necessary containers of the environment, i.e web containers, loadbalancer, proxies and database with one shell command:
You can find a lot of beginner tutorials on how to use docker-compose. This is why I wanted to try out a bit more than just starting an app and database container and linking them together.
My idea was to startup this environment with docker-compose
We are going to use the tutum/haproxy image for the loadbalancer and the redis image for the database.
For the other components, I’m gonna create a nginx proxy and a flask web app.
Docker-compose isn’t part of the docker package. So you will need to install it separately.
There are many ways to install it, including a curl-way. But I prefer
For further information visit the docker docs.
First we will need to create a project directory. Let’s just call it example
In this directory we will create a directory for each of our custom containers we are going to build, which are the nginx and flask. To simplify things, I’ll call the flask web app directory just app.
We will use j2cli to create a nginx configuration from a template.
The syntax is jinja2. This will make it very easy to dynamically set the loadbalancer address and port as a proxy.
Our container can get this information from the environment variables which are set upon linking it to the haproxy.
Don’t bother mentioning that I defined localhost as servername. It’s obvious that you have to set it to your prefered one.
Why redirect the logs to /proc/self/fd/{1,2}
you ask? Thanks to this we can see our logs with docker logs
.
Now we create our Dockerfile and start script.
We could now build the docker image, but we will leave that to docker-compose.
Let’s concentrate on our flask web app now.
The objective is to have a simple index page showing data from the database, i.e a visit counter. To test our loadbalancer I want to return the hostname too.
Here is the code I’m using. I saved it under ~/example/app/app.py
.
I’m using the environment variables REDIS_PORT_6379_TCP_ADDR
and REDIS_PORT_6379_TCP_PORT
to connect to the redis database.
This environment variables will be available thanks to linking the container to the redis database.
Now let’s create a Dockerfile for our web app too.
We are nearly there. We just need to create our pretty YAML file as a definition for our “container orchestra”.
We are defining the components in a really simple way. The build
options tells docker-compose in which directory it can switch to build the container image.
image
is used to take an already existing image.
links
is one of the most exciting options. Not only it tells our containers with which other components it is linked to, it also creates a dependency-relationship between them. It makes sure your containers will start in the right order.
Our app is listening to port 5000, that’s why I’m passing BACKEND_PORT as environment
variable to the haproxy. It will now forward requests to the right port.
Finally, I want to test the app over our nginx. That’s why I’m mapping 80:80 with the help of ports
No, not yet. There is something else we have to do.
With this configuration docker-compose would only start one single web app container. But we want to start three. This is where docker-compose scale
comes in handy.
Taken from the command line reference:
Why not try it out?
Aha.
It builds the container image and creates 3 containers. But is it starting them up already?
We can look that up with docker. The answer is yes, but no. It simply stopped them afterwards.
Yes. Now is the time to finally bring the environment up.
We could have used docker-compose up -d
to not see all this noise. These logs are always available over docker-compose logs
.
What does docker ps
tells us now?
It brought up our redis database, haproxy and nginx container. It also created 3 new containers for the web app, app_3,app_4 and app_5.
Docker-compose itself has a handy ps
argument too.
Does the haproxy really work?
Is it balancing requests with the round robin algorithm?
Is our nginx proxy doing his job?
Will the redis database be reachable from our flask app?
So many questions, so let’s just try it out!
YAY IT WORKS
Docker-compose can help us define a whole container orchestration in one single file. We don’t need anymore to start up containers in the right order and link them, docker-compose takes care of it now.
There is way more to know about it though. It comes with many options and arguments I haven’t yet read about.
But in hope I will find more time in future, I’m looking forward to try them out.
You can find the whole example project on github.
]]>I was already going through the interwebs for a few weeks, until I found some promising themes I wanted to try out on jekyllthemes.org.
After some days, I got hooked by the wonderful, yet simple jekyll themes Mu-An Chiou designed. Seriously, go check her work out on muan.co or on her github profile.
In the last 5 days I went full jekyll mode. I switched to so many themes on my development environment, that I can hardly remember a single one of them.
But what caught my eye was scribble. I find it:
That’s about it. I’m easy to impress, I know. A few of my friends like it, others don’t. But what matters is my own opinion. And I like it a lot.
My standalone HTTP Server isn’t required anymore. I switched using Docker with tutum now, even on my production homepage.
Oops. Let’s look at a few more details.
I’ve only got one cluster with two really cheap (5$) Digitalocean nodes deployed on it. It may seem not that much, but the cool thing is, that at the moment it’s more than enough.
On the other side, I’ve got way to many docker instances.
Yes, you saw right. 9 docker instances deployed on two 1CPU/500MB nodes. It gets kinda interesting to see how the services are connected with each other.
It took me way more time than I intended to draw this. So please, at least look at it for a few seconds.
Every connection between the services is accomplished with the docker linking technology. eyenx-ch-rp, the nginx reversproxy, is linked with the two loadbalancers eyen-ch-lb and eyenx-ch-dev-lb and these services are linked with their respective jekyll backends. For the loadbalancers I’m using the haproxy docker image provided by tutum as described in my previous post.
Personally I think that 4 containers in the production eyenx-ch-jekyll service might be a little overkill. But I’m just playing around with the tutum scaling capabilities.
When creating the jekyll services, I wanted them to have the sequential deployment option active. Sadly, upon finishing the service creation process, I saw the missing ON flag in the eyenx-ch-jekyll service details.
A few minutes later I tried again and took some screenshots for the purpose to contact the tutum support team. This was their response:
I gratefullly denied their kind offer. It just was nice to know they were already working on the fix.
This might not be a mistery. Anyway, I’ll show you my Dockerfiles on which I worked so hard (~10 minutes).
You may ask yourself why my start command is git pull;jekyll serve
.
I update the git repository under /src
every time the container starts. This gives me the possibility to update my static generated homepage without actually having to redeploy the whole service. I can achieve an update with absolutely no downtime with this simple for loop:
Finally let’s take a look at the eyenx-ch-rp Dockerfile.
The nginx.conf
is created from a Jinja2 template file using j2cli. For more information visit my github project or the public docker repository
Visit it now if you don’t know about this yet: tutum.co
The whole Docker thing caught my eye very fast. I started messing around with dockerfiles, building my custom images, running some containers, just for fun.
After some time I heard DigitalOcean was making the CoreOS image available for their droplets.
I also started messing around with CoreOS. It is very simple to set up, given the good tutorial available on DigitalOcean.
But it wasn’t something I could migrate to in minutes. I needed more time to make the service stable.
Last week I received an email from Tutum announcing their new service available at http://dashboard.tutum.co. Their objective was to stop doing actual hosting and concentrate on the management of docker containers.
They also announced their native support with DigitalOcean. I was looking forward to try it out.
The idea of Tutum is to serve as a managing application for deployment of entire container clusters. They also give you a private docker repository for free, which is nice.
After connecting my Tutum account with the DigitalOcean one, I deployed my first node cluster.
The next step was to deploy a service.
I looked a long time at some already built jekyll dockerfiles, but none of them seemed to match my expectations.
For some days or weeks I was idling. So I decided to just use my own dockerfile for my blog. As starting image I tried using base/archlinux.
The nginx.conf shouldn’t be such a hassle for you.
After building the image, trying it out and pushing it to the private repository of tutum.co, I could finally deploy my first service.
To try some stuff out, I even deployed it loadbalanced. And it is really easy to accomplish.
Also, this tutorial helped a lot.
Probably you aren’t reading this content from a deployed container right now. I haven’t switched yet.
I’m still trying everything out and also waiting for Tutum to make some more steps. At the moment, the Tutum-deployed service is available at http://dev.eyenx.ch.
]]>